步骤3 通过关闭设备电源开关,将SwitchA、SwitchB、SwitchC下电,使用SFP+电缆连接后再上电。
说明
l 下电前,建议执行save命令保存配置。
l 本设备的stack-port 0/1必须连接邻设备的stack-port 0/2,否则堆叠组建不成功。
l 为保证堆叠组建成功,建议按照以下顺序进行连线上电(如果用户希望某台交换机为主交换
机可以先为其上电。例如,按以下顺序连线上电后,SwitchA为主交换机):
1. 为SwitchA~SwitchC下电;
2. 连接SwitchA与SwitchB之间的堆叠线缆;
3. 先为SwitchA上电,SwitchA启动后,再为SwitchB上电;
4. 检查SwitchA与SwitchB的堆叠组建是否成功,检查方法请参见步骤4;
5. 与上一步类似,连接SwitchC与SwitchB和SwitchA之间的堆叠线缆,再为SwitchC上电;
6. 检查SwitchA、SwitchB、SwitchC的堆叠组建是否成功,检查方法请参见步骤4。
步骤4 检查堆叠组建是否成功。
# 查看堆叠指示灯状态。
通过任意一台成员交换机的模式切换按钮,将面板上的模式状态灯切换到Stack模式。
如果所有成员交换机的模式状态灯都被切换到了Stack模式,说明堆叠组建成功。
如果有部分成员交换机的模式状态灯没有被切换到Stack模式,说明堆叠组建不成功。
说明
在支持业务口堆叠的设备形态中:
l S5700-HI、S6700 Stack模式状态灯与Speed模式状态灯共用一个模式状态灯。通过模式切换按钮将
模式状态灯切换到红色常亮(45S后灭掉)时,表示模式状态灯进入Stack模式。
l S2720、S2750、S5700-LI、S5710-EI、S5720EI、S5720SI、S5720S-SI、S5720HI、S6720EI、
S6720S-EI、S5710-X-LI、S5700S-X-LI、S5700S-28P-PWR-LI-AC有单独的Stack模式状态灯
(STCK)。通过模式切换按钮(MODE)将模式状态灯切换到绿色常亮/闪烁(45s后灭掉)时,
表示模式状态灯进入Stack模式。
# 查看堆叠系统的基本信息。
通过任意成员交换机的Console口登录堆叠系统,检查堆叠系统的成员交换机的个数与
实际组网中交换机的个数是否一致、堆叠链路拓扑状态与实际硬件连接是否一致。
<SwitchA> system-view
[SwitchA] sysname iStack
[iStack] display stack
Stack mode: Service-port
Stack topology type : Ring
Stack system MAC: 0018-82d2-2e85
MAC switch delay time: 10 min
Stack reserved vlan : 4093
Slot of the active management port: 0
Slot Role Mac address Priority Device type
-------------------------------------------------------------
0 Master 0018-82d2-2e85 200 S5700-28P-LI-AC
1 Standby 0018-82c6-1f44 100 S5700-28P-LI-AC
2 Slave 0018-82c6-1f4c 100 S5700-28P-LI-AC
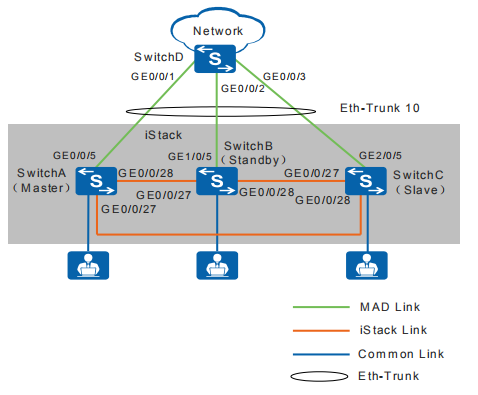
步骤5 配置跨设备Eth-Trunk。
# 在堆叠系统创建Eth-Trunk,并将上行物理端口设置为Eth-Trunk成员接口。
[iStack] interface eth-trunk 10
[iStack-Eth-Trunk10] trunkport gigabitethernet 0/0/5
[iStack-Eth-Trunk10] trunkport gigabitethernet 1/0/5
[iStack-Eth-Trunk10] trunkport gigabitethernet 2/0/5
[iStack-Eth-Trunk10] quit
# 在SwitchD上创建Eth-Trunk,并将与iStack相连的端口设置为Eth-Trunk成员接口。
<HUAWEI> system-view
[HUAWEI] sysname SwitchD
[SwitchD] interface eth-trunk 10
[SwitchD-Eth-Trunk10] trunkport gigabitethernet 0/0/1
[SwitchD-Eth-Trunk10] trunkport gigabitethernet 0/0/2
[SwitchD-Eth-Trunk10] trunkport gigabitethernet 0/0/3
[SwitchD-Eth-Trunk10] quit
步骤6 验证Eth-Trunk配置结果。
# 查看Eth-Trunk成员接口信息。以查看iStack上Eth-Trunk成员接口信息为例。
[iStack] display trunkmembership eth-trunk 10
Trunk ID: 10
Used status: VALID
TYPE: ethernet
Working Mode : Normal
Number Of Ports in Trunk = 3
Number Of Up Ports in Trunk = 3
Operate status: up
Interface GigabitEthernet0/0/5, valid, operate up, weight=1
Interface GigabitEthernet1/0/5, valid, operate up, weight=1
Interface GigabitEthernet2/0/5, valid, operate up, weight=1
步骤7 配置代理方式多主检测,SwitchD做代理设备。
# 在堆叠系统上,配置跨设备Eth-Trunk的代理方式多主检测功能。
[iStack] interface eth-trunk 10
[iStack-Eth-Trunk10] mad detect mode relay
[iStack-Eth-Trunk10] return
# 在代理设备SwitchD上,配置Eth-Trunk的代理功能。
[SwitchD] interface eth-trunk 10
[SwitchD-Eth-Trunk10] mad relay
[SwitchD-Eth-Trunk10] return
步骤8 查看多主检测配置结果。
# 查看堆叠系统多主检测配置信息。
<iStack> display mad verbose
Current MAD domain: 0
Current MAD status: Detect
Mad direct detect interfaces configured:
Mad relay detect interfaces configured:
Eth-Trunk10
Excluded ports(configurable):
Excluded ports(can not be configured):
GigabitEthernet0/0/27
GigabitEthernet0/0/28
GigabitEthernet1/0/27
GigabitEthernet1/0/28
GigabitEthernet2/0/27
GigabitEthernet2/0/28
# 查看SwitchD的代理信息。
<SwitchD> display mad proxy
Mad relay interfaces configured:
Eth-Trunk10
----结束
配置文件
l
堆叠系统的配置文件
#
sysname iStack
#
interface Eth-Trunk10
mad detect mode relay
#
interface GigabitEthernet0/0/5
eth-trunk 10
#
interface GigabitEthernet1/0/5
eth-trunk 10
#
interface GigabitEthernet2/0/5
eth-trunk 10
#
return
l
SwitchD的配置文件
#
sysname SwitchD
#
interface Eth-Trunk10
mad relay
#
interface GigabitEthernet0/0/1
eth-trunk 10
#
interface GigabitEthernet0/0/2
eth-trunk 10
#
interface GigabitEthernet0/0/3
eth-trunk 10
#
return
实验中发现若将交换机初始化后堆叠配置虽消失,但堆叠接口仍无法使用,查询文档后按照如下命令操作:
删除堆叠口操作
<HUAWEI> system-view
[HUAWEI] interface stack-port 0/1
[HUAWEI-stack-port0/1] shutdown interface GigabitEthernet0/0/24
[HUAWEI-stack-port0/1] undo port interface GigabitEthernet0/0/24 enable
清除堆叠配置
对于V200R011C10及之后版本的设备,执行命令reset stack configuration可以清除堆叠相关配置。包括:交换机槽位号、堆叠优先级、堆叠保留VLAN、系统MAC切换时间、堆叠口配置、堆叠口速率配置。
<HUAWEI> system-view
[HUAWEI] reset stack configuration
Warning: This operation will clear all stack configurations and may lead to the loss of the slot ID configuration and cause the device to reset immediately. Are you sure you want to continue? [Y/N]: y
说明:
执行该命令后会导致原有堆叠系统分裂,设备重启。
不支持该命令。
对于V200R011C10之前版本的设备及,需要根据配置分别删除,配置删除后需要重启设备才生效。
恢复堆叠优先级:
<HUAWEI> system-view
[HUAWEI] stack slot 2 priority 100 //将2槽位号的优先级恢复为缺省值100
恢复槽位号:
<HUAWEI> system-view
[HUAWEI] stack slot 2 renumber 0 //将设备槽位号修改为0
恢复堆叠保留VLAN:
<HUAWEI> system-view
[HUAWEI] stack reserved-vlan 4093 //将堆叠保留VLAN恢复到缺省值4093
恢复系统MAC切换时间:
<HUAWEI> system-view
[HUAWEI] undo stack timer mac-address switch-delay
删除堆叠口
V200R002之后的版本
<HUAWEI> system-view
[HUAWEI] interface stack-port 0/1
[HUAWEI-stack-port0/1] shutdown interface xgigabitethernet0/0/1 //为避免环路,先将成员口设置为down
[HUAWEI-stack-port0/1] undo port interface xgigabitethernet0/0/1 enable //将成员端口XGE0/0/1退出堆叠口,恢复为业务口
V200R002及之前的版本
<HUAWEI> system-view
[HUAWEI] interface stack-port 0/1
[HUAWEI-stack-port0/1] undo port member-group interface xgigabitethernet 0/0/1 //将接口XGE0/0/1从堆叠口中退出
[HUAWEI-stack-port0/1] quit
[HUAWEI] undo stack port interface xgigabitethernet 0/0/1 enable //将接口XGE0/0/1恢复为业务口